Send us a message to schedule or get a quote. We respond quickly via email and phone.
We can help you with your pool table if you need it professionally installed, leveled, and the cloth installed on it.
Pool table installation is technical in nature and should be done by a trained pool table installer. Since we move pool tables we naturally have experience in the pool table installation side of the business.
On a side note, many people don’t know that the best time to refelt the pool table is during installation so if you are considering moving or buying a pool table, check your options for new cloth when we install the pool table for you.
During extensive leveling our technicians precisely set, shim, wedge, and level the slates using sensitive leveling equipment to make sure your pool table installation is done to the highest quality for optimum performance.
You’re also covered by our exclusive service guarantee issued by the only organization in our industry, the ABIA.
If you need us to bring the pool table upstairs, there may be an additional cost. 1 pc. slates we cannot guarantee we will move but check for possibilities depending on the situation.
We will also pick up the pool table from a storage facility or you’re on-site storage before we do the actual pool table installation for you. Just let us know the details of your job.
Pricing for pool table installation
The pricing on the installation of your pool table will depend upon a few circumstances. If the table is in the room already, will there be stairs, what the table size is and if the new cloth is needed for recovering the table during installation.
It helps to get the following information before contacting us, this will give you a head start on your job:
- Size of pool table we will be installing
- Is the pool table in the room or will we take it up or downstairs?
- Is your cloth in good condition or would you like to change it?
- Is this pool table a 3 piece or 1 piece slate?
- Does the table have a drop pocket build or a ball return system?
*We can add Championship woolen felt or upgraded tournament grade worsted cloth for additional charges but you save if we recover the pool table at the time of installation.
The ABIA guarantees all of our pool table installations for leveling and quality on all applicable pool tables for an entire year after service.
Pool Table Assembly / Installation
How to assemble/install a pool table
There are many ways a pool table assembler with experience may complete a professional pool table installation and this general outline is just that, general. A pool table installer may end up skipping many of the installation descriptions here and may also perform additional pool table installation techniques that are not mentioned here. Please use this guide as a method of learning what is involved in the installation of a pool table, not a hard set of instructions where you can expect a perfect pool table installation if you do it yourself. Experience in the pool table installation field we feel is necessary for the best installation possible.
Perfect pool table installation?
Assembling a pool table is a difficult task and should be performed by a professional pool table installer. There are a few people out there that would still like to try it themselves no matter what the outcome is and don’t mind installing the pool table and finding that after all of the investment of time, tools and money the pool table installation was not as they expected and they must still pay a professional installer to come and finish the job correctly.
After professionally doing thousands of pool table installations we do not recommend trying the task by yourself but of course, there are those who are that type of person and will do the pool table installation attempt.
There are many different styles of pool tables out there. We will only discuss the most common and popular style that we install today.
Installation of a furniture style pool table
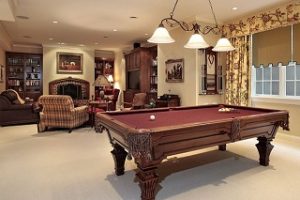
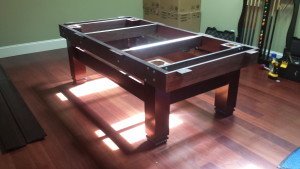
As shown in the picture, a furniture style pool table has four legs and a wood cabinet or frame. Most pool tables come with the frame already assembled but in some cases, a complete pool table assembly will be needed out of the box. Most pool table installations will be pre-assembled as used pool tables are generally the installation service needed. Most pool tables sold new are sold with installations included and do not need to be lined up.
If it is not assembled, the frame will come with instructions on how to construct the frame. Once the frame is constructed, the first thing that you should do is put the cabinet upside down on the floor where you plan on putting the pool table. You now can put the legs on the brackets on each of the four corners of the cabinet.
You only need to put the nuts or bolts on the legs with washers enough to where you can flip the pool table and the legs will be underneath it. After you flip the pool table, you can put the legs in the position that they look the best and then tighten the nuts or bolts. Now you need to measure the pool table off of the wall and make sure it is in the position that you desire.
Pool table placement in the room
Pool table installations require alignment in the room. Make sure you do this before installing the slates on the table. You should either center the pool table in the room or measure from the wall that you want to get closest to and make sure you have about 59 or 60 inches to the playing surface (usually about 2 or 3 inches inside the outermost part of the frame). You should also measure at two points on the length of the pool table to be sure that the pool table is square off the wall. You should put your level on each of the four sides of the frame and try to get the frame level by using shims. This will make your job easier in the later stages of the pool table installation.
Pool table installations step. Slate installation.
Now that you have the cabinet and legs in position, you can put the slate on the pool table. Assuming that you are putting together a three-piece slate pool table, you should be able to tell by looking at the slate, which one goes where. The pockets will be on all four corners, and two in the center of the middle piece of slate. You should put the middle place in position first and leave the two other pieces about two inches away so that you can see what you are doing.
You should try to center the centerpiece of slate by visually looking at the side of the cabinet. Many times the cabinet has grooves on the frame that has semi-circles cut out in the center of the cabinet. Once you have the piece visually close, you should take a tape measure and measure all four corners of the edge of the slate to the edge of the frame of the pool table. If the piece is truly centered, all four of those measurements should be the same.
Now that you have the centerpiece of slate centered on the pool table, you can slide the other two-piece into their final positions. Perfect pool table installations require a good leveling job or the table just won’t play right.
The next step during the pool table installation is leveling the slates of the pool table. Using a machinist’s level, you need to first determine which side of the pool table is the highest. This is important because if you start at the lowest end when you get to the highest end, you won’t be able to make it go down.
Start by standing on one of the ends of the pool table. Put the level on the edge facing left and right on the outer edge of the slate just in front of you. Put the shim on the lower side so that you can get the bubble even. You can generally tap the shim with a hammer or mallet once it is between the frame and slate. Once you have the bubble even, you can move the level to the other end of the slate on the opposite edge of that same piece of slate that is on one end of the pool table. You will put shims on both corners of the edge of the slate as close to the screw holes as you can.
These are on the outer edges of the pool table and be careful to not let the shim go under the screw hole (If you screw the shim in place, you won’t be able to adjust it later). You will have to move the level back and forth between this position and a perpendicular one that will help you level the slate in the other direction.
While leveling this first piece of slate, there are three positions that you will place the level. From left to right while you are standing at one end of the pool table. Once on the edge closest to you, and again on the other edge of that same piece of slate.
You will also place the level in the center of that same piece of slate, perpendicular from the other direction. Once you are able to get the bubble level at all of these locations you should put the screws in all of the screw holes. The best way to do it is to screw them all the way tight and then back them out about a ¼ turn. This will ensure that they have the same pressure.
You will now need to level that piece of slate again, in the same manner, using the screws and the shims. The entire time you need to make sure the screws have an equal amount of pressure on them as you tighten or loosen the screws. I know a lot of this information is hard to handle, but installing a pool table is a difficult task, as I had mentioned earlier.
This first piece of slate was the hardest one to level. From now on you only need to put the level on the opposite end of the piece that is already level and in the centered perpendicular position.
The edge of the plate that butts up the piece of slate that is level, needs to be flush with the leveled slate. You can make it flush by using your hands and try to make it feel as smooth as possible. You will also repeat the leveling after you put on the screws, just like before.
After you have the pool table level, you need to wax the seams of the slate. The seams are the points that the pieces of slate come together. You can do this using beeswax, a propane torch, and a metal paint scraper. Use the torch to melt the beeswax and let it drip along with the seem.
Leave enough so that you can get the dried wax line a few inches wide. You can go side to side with the torch to spread the wax out along the seam. Once the wax has dried you can scrape it with the paint scraper. You should also fill any screw holes with the wax. The screw holes take a little longer to dry. You can then scrape them flat as well.
You can reuse the beeswax throughout this process.
Once everything seems flat the pool table slates surface, run your bare hand across the entire surface and make sure that there are no pieces of beeswax left and that there are no small holes in the slate. When we do our pool table installations we use the cloth to sweep the slate pushing any particles off of the playing surface so they are not trapped under the cloth.
Now that you have an extremely flat surface, you can put the felt on the bed (slate) of the pool table. You can follow the following link that will show you how to put the felt on the slate and also how to put the felt on the rails.
Now that you have felted the bed and rails of the pool table, you need to cut the holes on the slate so that the bolts can go through the felt. You should use a razor blade and make the holes large so that you can see through them later. You also need to put the pockets on the rails of the pool table. The best way to do it is to only put two of the corner pockets on one of the end rails of the pool table.
The end rails don’t have the fold at the edge of the bumper. The other two corner pockets go on the other end rail of the pool table. The two side pockets can go on the sides of the side rails where the fold is present. You can assemble the two long side rails of the pool table. Now you can slide the rails together on top of the pool table. You will have four pocket bolts that will remain missing from the pool table.
Once everything is assembled and looks right, you can go underneath the rails and put the rail bolts and washers in by hand around the pool table. You don’t need to tighten anything yet. Once you have all of the rail bolts started, you can tighten the rails onto the pool table. You should start at one of the side pockets and tighten one of the long rails first.
You need to look down the long rail and make sure that the two individual rails are lining up properly. You can tighten the two bolts that are closest to the side pockets and check again to make sure the two rails line up with each other. Now you can tighten the rest of the side. The next step is to tighten the other long side rail in the same manner. The two end rails need to be pushed in to close any gaps between the pockets and rails and then tightened in position. Your pool table should now have all of its rails tight and in their correct position.
Now you need to go around the pool table from underneath and staple or screw in the pockets. You just need to make them look symmetrical, open, and pretty. The pockets have flaps on the outsides of many of them. You can now fold the flaps between the pockets and the pool table to make them look good. Finally, you can put the spot on the pool table and begin playing pool.